
Recent Posts

Showing posts with label recipe. Show all posts

Sunday, January 24, 2010

Foodbuzz 24, 24, 24: Stock the Kitchen

Each month, Foodbuzz hosts 24 Meals, 24 Hours, 24 Blogs where they highlight a group of meals that happen on the same day. I always enjoy reading these posts and have tried to think of creative ideas so that I could apply and participate, and I finally thought of one – and was so excited to find out I had been chosen for the January 24, 24, 24!

One of my friends from my book club was pregnant (and just had her baby last week), and the other club members and I had previously discussed creating a schedule so that we could provide meals for Cassi and her husband Hal after the baby arrived. We knew it would be a huge adjustment for them to bring the baby home, and the last thing we wanted was for them to be stressed out over preparing food.

When I started thinking about our cooking schedule, I thought it would be much more fun to turn one of our book club meetings into a cooking party! I decided to host a “Stock the Kitchen” party where we could all share a meal together and then cook several freezer-friendly and pantry stable meals for Cassi all at once.

After collecting recipes from other book club members, I went grocery shopping on Thursday night:

We started out the party evening by enjoying dinner together. When I thought about what to serve for my friends, I wanted something that everyone could enjoy but also customize to their individual tastes. So, we had a taco bar! The protein was grilled shrimp (which was coated with olive oil, paprika, a little bit of crushed red pepper flakes, and splash of hot sauce) and the toppings included lettuce, diced red onion and tomatoes, shredded red cabbage, sliced avocados, fresh cilantro and lime wedges.


taco 2


We also had white and blue corn chips, guacamole, and my 5 Minute Salsa:


5 Minute Salsa

2 large tomatoes, roughly chopped
1/2 red onion, roughly chopped
1 jalapeno, ribs and seeds removed
2 cans Rotel tomatoes, drained
a large handful of cilantro

Place the fresh vegetables in a food processor and pulse until coarsely chopped. Add the Rotel tomatoes and cilantro and pulse until everything is combined.

*I like to make this salsa at least a few hours in advance and store in the refrigerator so the flavors can combine.*

___________________________________________________

We also had some of these while we ate:


What taco bar (or party) would be complete without a margarita or two? I put my friend Sylvia on drink duty while I finished chopping the taco toppings and she mixed some excellent margaritas.

___________________________________________________

After dinner, we started preparing Cassi’s food. In the course of three hours, we prepared a large list of food and packaged it to go into the freezer (including reheating directions on each package). We made:

  • Granola
  • Spiced Carrot Muffins
  • Vegetable Soup
  • Chicken Pot Pie
  • Chicken Cordon Bleu Casserole
  • Lasagna
  • Chocolate Chip Cookie Dough


While Sylvia and I started working in the kitchen on the hot food, I set up my Kitchen Aid on the dining room table and created a baking station for Kim to work on the chocolate chip cookie dough:


After scooping the dough, Kim placed it directly in the freezer and then packed it up in a plastic zipper bag. And, of course, we baked up a few for dessert! To see the recipe for the chocolate chip cookies, please see this post.

___________________________________________________

During this time, Sylvia was cooking chicken for both the chicken pot pie and the casserole, and I was making vegetable soup:
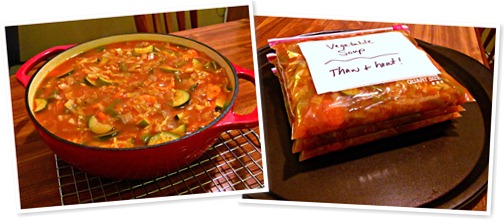
After cooking and cooling, I ladled the soup into zipper bags in three-cup portions, labeled and stacked them, and placed them into the freezer.

Vegetable Soup
(adapted from the Weight Watchers Zero Point Soup recipe)

- 2 carrots, sliced
- 1 onion, diced
- 2 cloves garlic, minced
- 2 T. tomato paste
- 6 c. fat-free broth, either chicken or vegetable
- 4 c. shredded cabbage
- 3 small zucchini, sliced
- 1 1/2 c. green beans, either canned (drained and rinsed) or frozen
- 1 t. salt
- 1/2 t. black pepper
- 1 T. Italian seasoning

Spray a large stockpot or Dutch oven with non-stick stray and sauté the carrots, onion, and garlic over medium heat until softened.

Add the tomato paste and stir until combined.

Add all of the remaining ingredients and bring to a boil. Reduce the heat and simmer until the cabbage and zucchini are cooked through.

___________________________________________________

After the chicken cooked and cooled, Sylvia diced it into small pieces so she and Kim could assemble the chicken pot pie and the chicken cordon bleu casserole.

Chicken Pot Pie
(adapted from SparkRecipes)

- 1 lb. boneless skinless chicken breasts, cooked
- 2 cans of Healthy request Cream of Chicken soup
- 1 16 oz. bag frozen mixed vegetables, thawed
- salt and pepper to taste
- 1 cup Bisquick
- 1/2 cup skim milk
- 1 egg

Cut the cooked chicken into small bite-sized pieces. Combine with the soup, vegetables and salt and pepper. Pour mixture into a baking dish.

Mix the bisquick, skim milk, and egg and pour over the chicken mixture.

Bake at 400 for 30 minutes, until heated through and the topping is golden brown.

*We assembled the chicken base of this recipe, then froze the dish without the topping. We sent the box of Bisquick along so Cassi could add this, but we thought the topping would become too soggy in the freezing process.*

___________________________________________________

I completely forgot to take a picture of this one before we packaged it, but here is the recipe. Also be sure to read the directions Sylvia wrote on the package because they are cute and funny!

cordon blue casserole

Chicken Cordon Bleu Casserole

- 3 c. cooked chicken breast, diced
- 2 c. cooked ham, diced
- 2 c. cooked pasta shells
- 1 c. cheddar cheese, diced
- 1 can cream of chicken soup
- 1 c. sour cream
- 1/2 c. skim milk
- garlic powder
- salt and pepper

In a 9 x 13 baking dish, layer the chicken, ham, pasta and cheese. Mix the soup with the sour cream, milk and spices and pour over the layers.

Bake at 350 for 20-25 minutes until heated through and golden brown on top.

___________________________________________________


The final recipe that I made together with Sylvia and Kim was the lasagna. To make it freezable, we boiled the noodles and assembled the dish but did not bake it. If I was going to bake it and eat immediately, I would use no-boil noodles and follow the directions as written. Also, the original recipe did not call for ricotta (it was a lower-fat recipe), but Sylvia and I decided that it just isn’t lasagna without ricotta and added it anyway.
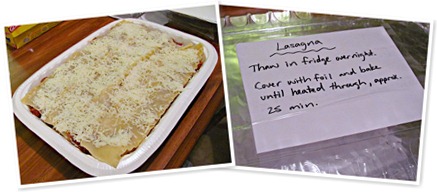

Lasagna

- 2 lbs. of lean ground beef
- one jar of marinara
- box of lasagna noodles
- 1 egg
- 1 t. Italian seasoning
- 1 15. oz container ricotta cheese
- 1 clove garlic, minced
- 1/4 c. mozzarella cheese
- 1 3/4 c. of mozzarella cheese to sprinkle on top

Brown beef and drain. Add in marinara and allow to simmer for 10 minutes.

Beat egg in a separate bowl and add Italian seasoning, ricotta, garlic and 1/4 c. cheese.

In a long dish, layer noodles, then half of meat mixture, then noodles, then egg/cheese mixture, then meat, then sprinkle with cheese.

Cover with foil, bake at 400 for 45 minutes.

___________________________________________________


In addition to providing some main meals, I wanted to include some breakfast items for Cassi. I decided to make a batch of granola (originally posted here) and Spiced Carrot Muffins that can be baked straight from the freezer.


Nutty Granola
(adapted from Ellie Krieger)

3 c. old fashioned oats
1 c. raw unsalted nuts (I used pecan chips and sliced almonds)
1/2 c. agave nectar
1/4 t. salt
1/2 t. cinnamon
1 c. raisins

Combine all ingredients except raisins and stir until everything is coated with agave nectar. Spread out on a cookie sheet coated with non-stick spray.

Bake at 275 degrees for 25-30 minutes, stirring twice during baking.

Mix in raisins and allow to cool on the cookie sheet.

Store in an airtight container for up to two weeks.

___________________________________________________

Spiced Carrot Muffins
(from Delish, adapted from Martha Stewart Living)

- 1 3/4 c. all-purpose flour
- 3/4 c. sugar
- 2 t. pumpkin-pie spice
- 2 t. baking powder
- 3/4 t. baking soda
- 1/2 t. salt
- 3/4 c. plain low-fat yogurt
- 4 T. unsalted butter, melted
- 1 large egg
- 2 1/2 c. shredded carrots

Line twelve cups (each 2 1/2 inches wide) of a standard muffin tin with paper liners; set aside. In a large bowl, stir together flour, sugar, pumpkin-pie spice, baking powder, baking soda, and salt; set aside.

In another bowl, whisk together yogurt, butter, and eggs. Make a well in the center of the flour mixture, and add yogurt mixture. Stir until just combined. Fold in carrots.

Spoon batter into prepared muffin cups. (If desired, muffins can be baked immediately in a 375 degrees oven for about 20 minutes.) Freeze until firm, about 30 minutes, then cover tin with plastic wrap, and freeze until ready to bake, up to 3 months.

Preheat oven to 375 degrees. Bake muffins (still frozen) until a toothpick inserted in center of one comes out clean, about 30 minutes. Transfer to a rack. Serve warm or at room temperature.

___________________________________________________


Finally, after all of the food was cooked, packaged and frozen, we sat down to write out the recipes on cards to present to Cassi and Hal. Even though she may not feel like cooking now, Cassi does enjoy it (I know, I’ve had her food before!) and I wanted her to be able to make these dishes again if they enjoy them.

Sylvia and I delivered the food to Cassi and Hal this afternoon and stayed for awhile to see baby Adelyn. I think they were very happy with the food and planned to make part of it right away.

I thoroughly enjoyed hosting my friends, having a great dinner, and making meals for a friend. I want to send a huge thank you to Foodbuzz for giving me the opportunity to Stock the Kitchen!

recipes 4

Wednesday, January 13, 2010

Spicy Chicken Lasagna


This post was sponsored by Foodbuzz and Pace.


chicken lasagna 2


A few weeks ago, I received two jars of Pace Picante Sauce through the Foodbuzz Tastemaker program. I immediately started thinking of recipe ideas that went beyond opening a bag of chips and pouring, even though that’s what I really wanted to do!

After thinking about what exactly what I wanted out of my Pace recipe (a main meal, something filling, and freezable leftovers) I decided to make a lasagna. I actually tested this recipe with both chicken and beef, and Scott and I both agreed that the chicken was much better.


Spicy Chicken Lasagna

*a Rachel ♥s Food creation*

- 8 lasagna noodles, broken in half
- 1 T. olive oil
- 1 medium onion, diced
- 2 garlic cloves, minced
- 1 lb. boneless, skinless chicken breasts, cooked and shredded
- 1 c. Pace Chunky Salsa
- 4 oz. cream cheese
- 1/2 t. salt
- 1/2 t. black pepper
- 1/3 c. fresh cilantro leaves
- 1 16 oz. jar Pace Picante Sauce
- 2 c. shredded cheddar cheese

1. Boil lasagna noodles in water according to package directions, drain, and set aside.

2. While noodles cook, heat the olive oil in a skillet over medium heat and cook onions until translucent. Add the garlic and cook for 1 additional minute.

3. Stir in shredded chicken, salsa, and cream cheese and heat until the cheese melts and the mixture is bubbly. Turn off the heat and stir in the salt, pepper, and cilantro.

4. Spray an 8x8 baking dish with cooking spray and cover bottom with a thin layer of picante sauce. Then layer 4 half noodles, chicken filling, picante sauce and 1/4 c. cheddar cheese. Repeat the layers two additional times.

5. Place the last 4 half noodles on top and cover with remaining picante sauce and cheddar cheese.

6. Bake at 375 for approx. 20 minutes until the cheese is browned and the lasagna is bubbly.

7. Let the lasagna sit for at least 10 minutes before cutting into 9 servings.


Scott and I have enjoyed this dish twice now. It makes a great dinner paired with some vegetables and either chips and salsa or garlic bread. The lasagna also freezes and reheats nicely – I just thaw it overnight in the refrigerator and then heat it in the microwave or the oven at 350 for 10 minutes.

I hope you enjoy!

Thursday, December 31, 2009

Sausage & Mushroom Puff Pie


As I said in my last post, I planned on using my second piece of puff pastry for something savory. After making and tasting this today, I decided to do a second entry in the Pepperidge Farm 1,2,3 Puff! contest in the Main Dish category.

I think this recipe would work well as a main dish for any meal. I would pair it with fresh fruit for breakfast, a light salad for lunch, or maybe steamed veggies for dinner. Also, I ate my serving today at room temperature. I think that helped some of the flavors, especially the thyme and Dijon mustard, come through a little more.

This recipe definitely has a longer ingredient list than my Salted Chocolate Orange Croissants, but it was almost as easy to prepare.

Stay tuned to find out if I placed in the contest! The winner will be announced January 15 and will receive an all expenses paid trip for two to NYC, including a tour of NYC’s acclaimed pastry shops. Wouldn’t that be exciting?


Sausage & Mushroom Puff Pie
* a Rachel ♥s Food creation*
serves 8

- 2 sheets Pepperidge Farm puff pastry, thawed according to package directions
- 2 t. olive oil
- 8 oz. white mushrooms, roughly chopped
- ½ medium onion, diced
- 1 garlic clove, minced
- 8 oz. mild bulk pork or turkey sausage
- ½ t. salt
- ½ t. black pepper
- ¼ t. red pepper flakes
- ½ t. dried thyme
- 2 T. Dijon mustard
- 1 c. sharp cheddar cheese, shredded
- egg wash (1 egg beaten with 1 T. water)
- coarse salt and black pepper

To make filling:
Heat olive oil in a skillet over medium heat. Add the mushrooms, onion, and garlic and cook until browned. Add the sausage, breaking it up into small pieces, and cook until sausage is browned and cooked through. Drain off any fat, and then stir in salt, black pepper, red pepper flakes, and thyme.
Set aside to cool slightly.

To assemble:
Preheat oven to 425 degrees.
Lay 1 sheet of puff pastry flat on a baking sheet lined with parchment paper. Brush on Dijon mustard, leaving a 1 inch border all around the pastry. Top with sausage mixture and shredded cheese. Brush the border with egg wash.
Lightly roll out the 2nd piece of puff pastry (so it will cover the filling and meet the 1 in. border) and lay over the sausage and cheese filling. Lightly press so the edges will stick together. Trim any uneven edges with a pizza cutter or sharp knife.
Brush the entire pie with egg wash and sprinkle with coarse salt and black pepper. Use a sharp knife to cut three small slits in the top of the pastry to vent steam.

To bake and serve:
Bake at 425 for 12-15 minutes until puffed and golden brown. Let the pie sit for 5 minutes before cutting. Cut into squares or strips and serve.

Tuesday, December 29, 2009

Salted Chocolate Orange Croissants

croissants


Hi everyone! I hope you all had a fantastic Christmas. I was very excited and happy to receive a new laptop from my parents and hope to have more regular posts from now on! It was very difficult to have both my laptop and desktop crash in the last two months.

A few weeks ago, I received a coupon for a free package of puff pastry through the Foodbuzz Featured Publisher program and Pepperidge Farm. These coupons were sent out so members could enter the 1,2,3, Puff! recipe contest, and here is my entry.

I absolutely love croissants, especially chocolate ones, but don’t buy packages of them that often because they go stale quickly. I also love combinations of chocolate and orange (the only fruit/chocolate combination I do enjoy, oddly enough) and thought it would be a nice surprise inside a pastry. The “salted” part of it was inspired by one of my favorite chocolate bars, Lindt’s A Touch of Sea Salt, and the idea of a sweet/salty balance within the dish.

These were quite simple to prepare. Now the hard part is not eating them all tonight!

Also, I only made half of a recipe of these for us, but wrote the recipe to use an entire box of puff pastry. I plan on using the remaining sheet on a savory dish later in the week.


Salted Chocolate Orange Croissants
*a Rachel ♥s Food creation*
makes 24 small croissants

- 2 sheets Pepperidge Farms puff pastry
- 2 oz. semisweet chocolate, chopped
- zest of 1 orange
- 1/2 t. flaky sea salt, divided
- 2 T. butter, melted

1. Thaw puff pastry according to package directions and unfold onto a cutting board.

2. Preheat oven to 400 degrees.

3. Cut each pastry sheet into 12 triangles, like so:

croissant grid

4. Brush the pastry triangles with 1/2 of the melted butter.

5. Mix the chocolate, orange zest, and 1/4 t. salt in a small bowl, then place 1/2 t, of the mixture into the center of each triangle.

6. Roll the croissants, starting with the wide end and seal edges around the chocolate.

7. Place croissants onto a baking sheet lined with parchment paper.

8. Brush the tops of the croissants with the remaining butter and sprinkle with the remaining salt.

9. Bake for 10 minutes until puffed and golden brown.

10. Enjoy!

Tuesday, December 22, 2009

Mint Chocolate Eggnog


I created this recipe a couple weeks ago to enter the Eggland's Best Holiday Recipe contest hosted by Tina at Carrots n' Cake. Sadly I did not win anything, but Scott really enjoyed it and has requested more! Eggnog is one of his favorite treats, and he has already had two whole quarts of it this holiday season. Add this to his love of ANYTHING chocolate and mint, and I think we have a winner in our house.


Mint Chocolate Eggnog
makes 14 - ½ c. servings

4 large eggs
1/3 c. sugar
1/3 c. cocoa powder + extra for garnish
¼ t. salt
1 quart + 1 c. reduced fat milk
1 t. pure vanilla extract
1 t. pure peppermint extract
1 c. heavy whipping cream
Soft peppermint sticks (optional)

1. Whisk eggs, sugar, cocoa, salt, 1 c. milk, and both extracts in a small pot. Cook over medium heat, whisking constantly, for approximately 5 minutes until thick and foamy. Set aside and let cool.

2. Strain egg mixture (to remove all solids) into a pitcher and stir in 1 quart milk.

3. Whip heavy whipping cream until soft peaks form. Fold whipped cream into the eggnog mixture and serve.

Optional: Dust with cocoa powder and serve with soft peppermint sticks, if desired.


Monday, December 14, 2009

Quick Baked Potato Soup

After making the stuffed potato skins last week, I found myself with a Tupperware container full of baked potatoes in the refrigerator and nothing to do with them. Since I am making a conscious effort not to throw food away, I knew I needed to create something.

The weekend ended up being very cold and rainy, and what is better to eat during bad weather than a hot bowl of soup? After checking what was available in my pantry, this is what I used:

Quick Baked Potato Soup

1 quart fat-free & low sodium chicken broth
2 T. cornstarch
1/4 c. sour cream
1/4 c. half and half
1 t. black pepper
1 t. paprika
2 c. chopped baked potatoes (approximately)

Toppings: shredded cheddar cheese, chopped scallions and crumbled bacon (I used the pre-cooked microwaveable kind to keep it simple.)

- Whisk the cornstarch, sour cream, and half and half with a small amount of chicken broth.

- Stir the cornstarch mixture and the remaining chicken broth into a large pot and heat to boiling (it must boil briefly for the cornstarch to thicken the liquid).

- Turn the heat to medium low, stir in the potatoes, and let simmer until the potatoes are heated through and the soup is thickened.

- Top with the cheese, scallions, and bacon.


This recipe was quick, satisfying, and filling for a very small amount of work. The only downside is that the leftovers become extremely thick after refrigeration. If you try this recipe and have leftovers, make sure you have some extra stock on hand to thin it back out when reheating.

Enjoy!

Thursday, August 13, 2009

CEiMB: Stuffed Turkey Burgers

CEiMB

This week’s CEiMB recipe was Stuffed Turkey Burgers, hosted by Peggy of Pantry Revisited.

At first I planned on making the burgers substituting beef for the turkey, but I changed my mind during a last minute trip to the grocery store for supplies. My husband and I ate a lot of turkey burgers last year, almost once a week for the majority of the summer months, and I just got so tired of them! I thought I never wanted to eat another turkey burger again but decided to give them another shot.


The recipe was very simple, only using ground turkey, roasted red peppers, mozzarella cheese, salt and pepper. I got a little creative, though, and added a few crushed red pepper flakes and some Worcestershire to the meat for extra flavor. I also mixed the salt and pepper into the meat rather than sprinkling the outside of the patties to ensure the meat was flavored throughout.

While I was mixing the red peppers and mozzarella cheese to stuff the burgers, all I could think was pimento cheese. I guess it was pimento cheese in its most basic form, but the smell of it was fantastic and got me a little more excited about the recipe.

(topped with Dijon mustard, romaine, tomato and onion and
surrounded by one of my Light Brioche Sandwich Buns)


I noticed in some of the comments for the recipe that other people noted these burgers are very messy, but I didn’t think so at all. I had no problems with the filling leaking out while I was grilling the burgers or running out when I cut mine in half.

Here are my tips for a mess-free stuffed burger:

- Rather than forming two thin patties of equal size, I made the bottom patty a little larger than I wanted the final burger to be and added the stuffing. Then I made the top patty just large enough to cover the stuffing and overlapped the bottom patty and sealed it instead of just pinching the edges together.

- I also let the burgers rest for a few moments after grilling, not only to redistribute the juices in the meat but to allow the cheese stuffing to set up a little. That prevented the stuffing from running out.

My husband and I both enjoyed these burgers. His official review: “You could make these again…,” and let me tell you that’s the same as two thumbs up. I, however, enjoyed the stuffing more than the actual burger and will probably go back to my original idea of using beef instead of turkey. Either way, I know Scott will enjoy them because he has never met a burger he wouldn’t eat!

Thanks to Peggy for choosing another great Ellie recipe!

Sunday, August 9, 2009

Jambalaya

Hi everyone! I hope you are having a great Sunday.

This was my guest post that ran last week on RhodeyGirl Tests, but I decided to post it again on my blog so I can archive it. This is one of my favorite recipes and I hope you enjoy it!


A few years ago, I took a short cooking course with a personal chef who specialized in Mediterranean and Cajun cuisine, and one of my favorite recipes from the course was Jambalaya. This is definitely a favorite in my house and is requested often!

Over the years, I have made a few healthful substitutes that lighten the dish but, in my opinion, retain most of its integrity. For example, I have omitted the ham and substituted turkey smoked sausage for regular, halved the total amount of mean, upped the amount of veggies, and used low sodium beef broth instead of double strength.

I would also like to say that this recipe is obviously not for vegetarians, but I think it could be turned into one! Just substitute vegetable broth for the liquid and omit the meat, and possibly add cubed tofu as a substitute. I would definitely let it get nice and brown before adding any other ingredients.

Enjoy!


Jambalaya

serves 5-6

  • 1 T. olive oil
  • ½ lb. turkey smoked sausage, cut into small chunks
  • 1 medium onion, chopped
  • 1 large bell pepper, chopped
  • 1 garlic clove, minced
  • 1 c. uncooked Jasmine rice
  • salt and pepper to taste
  • 1 t. dried thyme leaves
  • 1 14 oz. can low sodium beef broth
  • ¼ c. water
  • 1 14. oz. can diced tomatoes
  • ½ lb. cooked chicken OR raw, peeled and deveined shrimp

Heat the oil in a Dutch oven or deep skillet over medium high heat, and then cook sausage until browned, about 5-6 minutes.

Stir in onion, bell pepper, and garlic and cook for two minutes to soften.

Add rice, salt, pepper, and thyme and stir until rice is golden.

Add the broth and water, stir to combine, and bring to a boil. Reduce the heat to low and simmer for 20 minutes.

Add the tomatoes and chicken/shrimp. Stir to combine, and cook until tomatoes and chicken are heated through or the shrimp are cooked.

Notes:

- Add two celery stalks for a true trinity (celery, onion, bell pepper). I personally hate it!

- Chop the vegetables into large pieces so they do not overcook during the long simmer.

- Although I love whole grain brown rice, I always use Jasmine for this recipe because it is more flavorful and I prefer the texture. You can substitute brown with great results.

- I think the best tomatoes to use are diced with green chilies.

- This is delicious with a little (or a lot) of hot sauce!

- For a slightly different but still delicious taste, garnish with chopped fresh mint leaves.

Monday, July 27, 2009

Mini Goat Cheese & Honey Tarts

For the past few months, I have been a member of a book club started by some of my coworkers, and it is always one of the highlights of my week. (Hi ladies!) To be completely honest, though, we like to eat as much as we like to read. We started out with early morning meetings at Starbucks, discussing the books over coffee and pastries. Then we moved to afternoon meetings at Panera or the Barnes & Noble cafe. Now, we still have our regular weekly meetings with snacks, but the final meeting for each book is held at a member’s house where we watch the book’s corresponding movie and enjoy a pot luck dinner. To make it even better, we have themed dinners to celebrate the latest book.

So far, I have contributed to these meals with a different course each time, covering salad, main entree and dessert (red velvet cake for our all-red Dracula party). For our latest party – honey themed for The Secret Life of Bees by Sue Monk Kidd – I claimed appetizers for something new.

So, I took it upon myself to create an appetizer that incorporated honey but was still a savory bite to begin the meal. I looked at what I already had at home to add and found walnuts and various herbs. Enter goat cheese and pre-made phyllo cups and you have a tasty appetizer than uses a lot of my favorite ingredients!

Mini Goat Cheese and Honey Tarts
makes 20 appetizers

  • 4 oz. goat cheese
  • 1/2 t. dried basil
  • 1/4 t. dried thyme
  • pinch coarsely ground black pepper
  • 2 T. honey
  • 2 packages phyllo cups (from the freezer section)
  • chopped walnuts

Preheat oven to 350.

Mix the first five ingredients until combined and creamy.

Use a small ice cream scoop or melon baller to spoon the filling into the cups, being careful not to crack the phyllo.

Sprinkle each with the chopped walnuts and lightly press down into the filling.

Bake for 8-10 minutes until filling is slightly melted and the walnuts are lightly toasted.

At first I was afraid these would be too much like a dessert from the sweetness of the honey, but the herbs and pepper add a nice savory contrast. Overall, I think they were a big hit at the party – at least the platter was empty when I left for home!

What are some of your favorite, easily prepared appetizers?

Friday, July 10, 2009

Mediterranean Style Tilapia

DSC00925

A few years ago, I took a 10 week long cooking class that was sponsored through the adult education program of a local high school. It was taught by a man, whose name I sadly cannot remember, who was a personal chef for other people in the area. This class was one of the best experiences I have ever had, and it definitely opened up my eyes to new techniques, cuisines, and flavor combinations that I had never tried before. Since then, I have made the ten recipes many, many times and for some have tweaked them to better suit myself and my husband.

This recipe was from the first night of class, and was originally titled Mediterranean Style Chops as the original recipe calls for pork rather than fish. I would call it Mediterranean Style (Insert Protein Here) because I have now made it successfully with pork, chicken, and as you see here, tilapia. I also think the sauce could be made alone and used on vegetables or even served just with crusty bread because it is THAT delicious. In fact, I think a little bit of leftover sauce ended up spooned over the green beans you see in the picture.

The original recipe serves four, but I usually halve it since it is just me and my husband. The recipe also reflects my personal changes, such as using white wine instead of marsala, and of course the change in protein. Also, don’t be afraid of the long ingredient list – everything melds together nicely and it is worth the work of chopping and measuring everything out. It is savory from the onions and garlic, sweet from the tomatoes, raisins and sugar, salty from the olives and capers, and tangy from the vinegar and lemon zest. You definitely don’t want to miss out on any of this flavor adventure!

I also think this would make an excellent vegetarian dish by subbing vegetable broth for the chicken broth and either omitting the protein or using tofu or tempeh.

Mediterranean Style Tilapia

  • 4 tilapia filets
  • 1/4 c. olive oil
  • 1 1/2 c. sliced onions
  • 1 c. golden raisins
  • 2 T. chopped garlic
  • 1/2 c. white wine
  • 1 1/2 c. chopped roma tomatoes
  • 1 c. chicken broth
  • 1/4 c. white wine vinegar
  • 2 T. sugar
  • 2 t. oregano
  • 1/2 c. pimento stuffed olives
  • 2 T. capers, drained and crushed
  • 2 T. chopped fresh parsley
  • 1 T. lemon zest

Heat oil over medium high heat, then add onions and sauté for three minutes. Add the garlic and raisins and cook for one minute.

Deglaze the pan with the wine, then stir in tomatoes, broth, vinegar, sugar, and oregano. Bring to a boil, then nestle the tilapia filets into the sauce. Cover and reduce heat to medium low and simmer for 10 minutes.

Add the olives and capers and simmer until heated through. Garnish with parsley and lemon zest.

* Note: If you make this recipe with chicken or pork, begin by searing the meat (either plain or dredged in flour) on both sides, then remove from the pan and follow the rest of the recipe as written. Return the meat to the pan where the directions say to add the tilapia filets.

When we made this recipe in class, it was served with orzo mixed with olive oil and parmesan cheese. In the picture, however, you can see I used brown rice. I think this would go well with any kind of small pasta or grain, so have fun mixing and matching!

Enjoy!

Technorati Tags: ,

Monday, October 20, 2008

Dealing with a few issues, but I have exciting news (x 2)!!

Sorry I haven't been around in awhile. I have been keeping up with everyone else's blogs in the past few weeks, but I feel like I have NO time lately for anything other than work and school. Full time work + full time grad school is really taking a toll on me, especially these past couple weeks before fall break. I didn't have any midterms, but the assignments have been very large and time consuming.

I've also been dealing with some health things, mainly pain in my right hip/thigh/knee. Eventually I went to the doctor (after it was excruciating to even sit down, we won't even talk about driving) and found out I have bursitis in my hip. At first I felt like an old lady, but after a little research I found out it can happen from repetitive activity (kind of like carpal tunnel, I guess). Luckily it was not infected! The pain is still lingering, but steadily going away. Forcing myself to exercise has helped.

I did manage to make some food during my busy weeks, though. A friend from school had a copy of Martha Stewart's Everyday Food magazine in class one night and I saw some interesting recipes, so I bought my own copy and tried the Spinach and Prosciutto Lasagna. It was delicious, but a little salty from the prosciutto. Next time I will cut the amount in half, or even omit it completely, because I think it would be just as good without it. Also, I recommend cutting it into six servings instead of four. It was extremely filling - I could never eat 1/4 of it in one sitting!


OK, on with the good news. First of all, I found out that I will graduate a semester EARLY! How often does that happen? I guess it paid off to work my butt off and take 27 graduate credit hours in three terms. I only have one class and a practicum left, then I'll be finished!

And...a HUGE ANNOUNCEMENT:

The Boyfriend is now....the FIANCE!! That's right, as of Friday night, I am engaged!

My ring:

Even closer up:


I'll admit that I'm a little nervous about planning a wedding, but I'm so excited! And it really helps to know that I'll be graduating early so I don't have to worry about that while finishing up wedding plans. We don't have a specific date yet, but we're thinking November of next year.

If anyone has tips to help me get started, they would be greatly appreciated.

Have a great night!

Friday, October 3, 2008

Experiments with cooking techniques

After reading Jenna's blog the other day, I was intrigued by whipped cottage cheese. I found some at the Fresh Market, so this morning I had some cottage cheese oats.

I used:

1/3 c. thick rolled oats
1/3 c. milk
1/3 c. water
1/3 c. whipped cottage cheese
1 T. ground flax
splash of vanilla extract
pinch of salt
sprinkle of cinnamon
handful of walnut halves

(Do you like all of my descriptive words for "just a little bit?")

This was an awesome combination that kept me full all morning while I ran errands.


Last night, I tried my hand at poaching. I had never poached food before (not even eggs) so I did a little research online and experimented on some salmon. I forgot to take pictures of the poaching process, but this is what I put in my liquid:

1 14 oz. can vegetable broth
8 oz. chardonnay
whole peppercorns
1 bay leaf
zest of one lemon (in strips, not grated)

I poached two pieces of salmon for approx. 10 minutes, and it was very good! The fish really picked up the flavors, especially the pepper. I also made some corn and stuffed summer squash, so I only ate half of my salmon.

So...today I ate the rest for lunch.

Before:


After, as salmon salad, with a few Kashi crackers.


For the salad, I added:

diced red onion
S & P
dried parsley flakes
capers (I love the little bursts of salty flavor!)
1 T. fat free mayo

I've never had a salad made out of fish other than tuna, so this was a nice change. I think I'll start cooking extra salmon when I make it for dinner for some new lunches.

I'm going to be traveling this weekend, so I'll see everyone on Sunday. Have a great weekend!

Saturday, September 27, 2008

Cooking Light

I bought the September issue of Cooking Light several weeks ago, but didn't have time to really look at it until a few days ago. I think this issue had a lot of great recipes. It's probably not on the shelves any more, but you should definitely search for this month's recipes on their site.

The first recipe was Turkey-Ricotta Meatballs. Sorry, the recipe isn't posted on their site yet, but I'll try to remember to link it once it it. These meatballs were great - they were very easy because they are baked, and they stayed moist due to the addition of ricotta cheese. The recipe called for part-skim, but I used fat free since that is what I had on hand.

I think my favorite part of the recipe is that it did not give specific directions on how to serve them, and I have found that they are extremely versatile. I put one half of the batch in some homemade tomato sauce (more on that later) and served it with pasta, and tomorrow we are having the second half in a stroganoff-type dish. I imagine they would also be tasty in some barbecue sauce or something similar as an appetizer.

Here they are, straight from the oven:


Now my dilemma is this - I have over half of a container of ricotta left over, and I don't like it on its own. Does anyone have a good recipe that incorporates ricotta?

Tonight I made the Thai Coconut Curry Shrimp. I really like Thai food (and by that, I mean all I have ever had is pad thai), so I decided to try making it. I have to admit that I have never ordered a curried dish at a Thai restaurant before because I was didn't think I would like something with coconut milk in it, but this recipe was quite good and very light.

I only made one substitution - I used dried basil instead of fresh because I couldn't find any at the grocery store.

With brown rice and steamed broccoli:


We also had some frozen and thawed mango for dessert. Yum!

I think I may subscribe to Cooking Light. I have really cut down on the magazines that I subscribe to due to so much paper used and the fact that I can find them online. There are some that I still really enjoy reading in print, though.

What magazine subscriptions do you have?

Wednesday, September 17, 2008

Three weeks later...

I'm back! The whole full time job + full time graduate school schedule took a little longer to adjust to that I expected. Anyway, I'm settled in at the job, and I turned in my first major assignment. I decided to celebrate tonight by doing a little blogging and NO homework!

Since it has been awhile, I'll just hit some highlights from the past couple weeks.

In "Eat a different fruit or vegetable each week" news, I bought a personal seedless watermelon:


Let me start by saying that I have never liked watermelon, but I was willing to give it a another try since I am trying to eat a diet with a lot more water-rich foods. Since watermelon is 92% water, it was the logical choice. Also, it has loads of lycopene! The verdict: I still don't like it.

Question: Has anyone eaten other colors of watermelon? Yellow or orange? Also, has anyone tried watermelon rind in any form (stir-fried or pickled)?


In "Rachel, get off your lazy butt" news, I bought a pedometer:


I was talking to my boyfriend's mother, who wears a pedometer daily and aims for 10,000 steps. She walks her dog twice a day and also tried to get in some extra steps at work. This picture was from my first day, but my numbers have ranged anywhere from 13,000 to 2,000 (bad, but in my defense, I was sick that day). By the way, with my stride length, 11,795 steps = 5.63 miles.
In "comfort food is good for stress" news, I made a childhood favorite for dinner one night:

Spanish Rice
(named this even though I'm fairly sure there is nothing Spanish about it)

1 lb. lean ground beef or turkey
1 large onion, diced
1 large green bell pepper, diced
1 14 oz. can tomato sauce
1 1/2 c. hot water
1 cup raw brown rice (the 10 minute kind)
1 T. yellow mustard (bottled, not the spice)
salt and pepper

Brown the meat, onion, and pepper, then drain. Add all of the remaining ingredients and simmer on medium-low heat until the rice absorbs all of the liquid (approx. 25 minutes).

This makes a huge batch, so I freeze half for another meal. I also serve this with garlic toast and corn, just like my mom did when I was little.


And finally, in "I can't resist a sale" news, I bought some cute square shaped bowls at Target:


And I filled them up with stir-fry. I stir-fried onion, mushroom, broccoli, water chestnuts, and shrimp and put some of that fantastic Garlic sauce and served it with some brown rice. Also, notice my new placemats, which were a gift from my boyfriend's mother. She made them - aren't they pretty?

Anyway, I'll be back again soon!


Tuesday, August 19, 2008

Spicy Chicken Sausage and Penne

Well, I went to the Fresh Market, but I only came home with some chicken Italian sausage and mushrooms. I decided to make a pasta dish and use up some of my pantry staples.

I literally threw this together. It was one pan dish (well, two since I had to boil the pasta) that was easy to make and clean up. I used the following ingredients:

2 chicken sausages
8 oz. mushrooms
1/2 c. chopped onion
minced garlic
1 14 oz. can Italian tomatoes, drained
capers
crushed red pepper flakes
salt and pepper
4 oz. dried penne, cooked according to package
1 1/2 oz. ricotta salata

I browned the sausage, mushrooms, onion, and garlic in a skillet while the pasta boiled. Once browned, I added the tomatoes, capers, red pepper (to taste, I measured in my palm), and S&P. I drained the pasta, mixed it in, and crumbled the ricotta on top.

It was very filling and not too bad calorie-wise since I used chicken sausage instead of pork.

The final product (with a guest appearance of my favorite spoon from Williams Sonoma):


I will be making this one again.

Parents' Visit Day 2

We started off our day with another mini quiche recipe: Mini Mushroom & Sausage Quiches. I found the recipe on the Food Network website, but it is from EatingWell magazine. They were better than the broccoli cheese ones I made a few days ago, probably because the seasoning in this recipe was better than my thrown together version.


My parents, boyfriend, and I ended up eating out for lunch while we were out shopping on Sunday. We went to a pizza place, and I had a cup of lentil soup and around 1/4 of a vegetarian calzone. I didn't take pictures at the restaurant, but the calzone will make an appearance as a leftover lunch.

My mom and I have a common love of kitchen gadgets, so she brought me a few things from a recent Pampered Chef party she attended:


She brought me a new chopper, a measuring cup (the kind Alton Brown uses, yay!), and a strange looking whisk. She also went by the local mill and got a bag of buckwheat flour, so I'll be looking for recipes that use that soon.

We also went to the Farmers' Market, since my parents have never been to one before. I got some blueberries, blackberries, peaches, a jar of blackberry butter, a jar of cranberry honey mustard, and one Cherokee purple tomato.


I'll be having lots of berries and leftovers this week.

Saturday, August 16, 2008

Crockpot "Smoked" Chicken

As I said in my post from Thursday, I made some "smoked" chicken for my parents' visit this weekend. I have to say, it was a success. I started with four large boneless, skinless chicken breasts and a spice rub.

(This is where I rant about spice rubs.)

I think most rubs have way too much salt. I understand it is there to season the food and pull out some of the liquids during the smoking process, but I really don't think a great amount is necessary. I started with Paula Deen's house seasoning, which consists of 1 c. salt, 1/4 c. black pepper, and 1/4 garlic powder, and turned it into this:

Rachel's Peppery BBQ Rub

1/4 c. coarse black pepper
2 T. garlic powder
2 T. onion powder
3 T. paprika
2 T. salt

Put it all in a small covered bowl and shake it up.


I sprinkled around 2 T. of the rub over the four chicken breasts and rubbed it in. After that, put it in your crockpot along with 1/2 c. water. Then you use the magic ingredient: Liquid Smoke. Yeah, sounds gross, but it gives everything a great flavor. Pour around 1 T. total over the chicken.

Cook it in the crockpot on High for 4 hours, then leave it on warm until you're ready to eat.

When it's time to eat, put the chicken in a bowl and shred it with two forks.

Then you're ready to put in on a bun, pour on some sauce, or do whatever floats your barbecue boat.

I used this:


I really wanted to buy the Fiery Habenero flavor, but I didn't know if anyone else would be as brave as me.

Here it is, all together:


I had around 1/3 c. chicken, 1 T. sauce, and 2 spoonfuls of vinegar cole slaw all on a potato bun. I paired it with 1/2 baked sweet potato.

Whole Wheat Oatmeal Pancakes


I really wanted pancakes for breakfast yesterday, but I wanted whole wheat. I looked around the Food Network to look at recipes to see ratios of flour to milk, etc. and came up with this recipe:

1/2 c. whole wheat pastry flour
1/4 c. rolled oats
1/2 t. baking soda
1/2 t. baking powder
1 T. protein powder
1 T. ground flax
1 T. sugar
cinnamon to taste
1 t. canola oil
1 egg white
1/2 c. fat free buttermilk

Mix all of the dry ingredients, then stir in oil, egg white, and buttermilk. Stir it only until it comes together (there will be some lumps), then let the batter rest while the pan heats.

I cooked them over medium high heat, probably 3 minutes on the first side and 2 minutes on the second. I topped them with a little Smart Balance and maple syrup. This made two huge pancakes, and I only ate one. Next time I think I will make more smaller sized ones so they are easier to flip, and I think it would help to monitor the cooking time.

Also, next time I am going to try whipping the egg white and folding it into the batter just to see how that changes the texture.


Thursday, August 14, 2008

Pre-made breakfasts

I had never eaten quiche before Easter of this year, but I instantly fell in love with it. Since then, I have made quiches for brunch and dinner and I like ability to use so many different ingredients. As I was looking for some breakfast recipes for my parents' upcoming visit, I saw several for mini quiches and I decided that they be a great pre-made breakfast item for when I start my new job.

Last night, I made broccoli cheddar mini quiches:


3 eggs
2 egg whites
1/2 c. 1% milk
2 T. fat free half and half
6 T. shredded cheddar
1 c. broccoli, steamed and chopped
2 T. fresh flat leaf parsley, chopped
1 scallion, chopped
salt and pepper

Whisk together eggs, egg whites, milk, and half and half . Pour evenly into 6 muffin cups (coated with non-stick spray). Add 1 T. cheese to each cup. Divide the broccoli, parsley, and scallions evenly between the cups. Sprinkle salt and pepper to taste, and lightly stir each cup with a fork.

Bake at 325 for 25 minutes. They will be puffed up when they come out of the oven but will deflate after a few minutes.

My thoughts: They need a crust. That is the main factor (for me at least) that makes quiche so enjoyable. Also, next time I will use all fat free half and half instead of milk, because I wanted to be a little creamier, and using all FF H&H won't add that many extra calories. So, I think I should rename them Broccoli Cheddar Baked Eggs until I tweak the recipe. Don't get me wrong, however, because they were still quite good.

Tuesday, August 12, 2008

I like free stuff.

I had to run some errands this morning, and I knew today was Free Vivanno Tuesday at my Starbucks, so guess what I had for breakfast:


When I got home, I tried out two new recipes. First was Potato and Bacon Soup, which is actually a Weight Watchers recipe. You would never know it though - it was thick and creamy and TASTY. It is made mostly with fat free chicken broth, but there is a little bit of half and half for creaminess. I topped it with one scallion, one strip of bacon, and a little mound of shredded cheese:


I also made some zucchini pancakes. Again, I read several recipes and pieced my own together. They were so good! The amount I had today made three pancakes. I meant to save one for tomorrow but ended up eating all three!


Zucchini Pancakes

1 medium zucchini, shredded with a box grater
diced red onion
chopped Italian parsley
salt & pepper
1 T. bread crumbs
1 T. grated Parmesan cheese
1 egg white

Lay shredded zucchini on a layer of paper towels for approx. 5 minutes to soak up some of the moisture. Then mix all ingredients together with a fork.

Heat oil in a skillet. Drop zucchini mixture into pan in large spoonfuls, then flatten out with a spatula. Cook on both sides until browned.